DLTK's Crafts for Kids
Hamster Toilet Paper Roll Craft
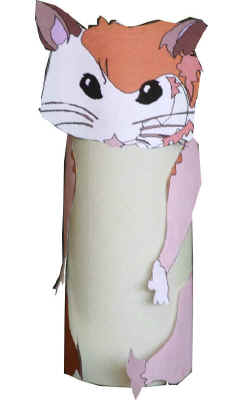
This is a simple three dimensional hamster craft that is fun for kids to make and play with.
A different looking hamster toilet paper roll craft can be found here.
Materials:
- toilet paper roll or cardboard tube,
- a printer,
- glue,
- scissors,
- something to color with,
- a piece of paper.
Instructions:
- Print out the template of choice.
- Color the pieces as appropriate and cut them out.
- Glue the large rectangular piece around the toilet paper tube.
- Glue string onto the back of the toilet paper roll to make a tail.
- Glue the head onto the front of the toilet paper roll.
- Glue on the paws (smaller ones are front paws).
- We typically make the crafts as if they're sitting up on their haunches as it's easier to construct them.
(I think the raccoon looks cute this way)
- However, you can make them so they stand on all 4's (use a straw, cardboard, toothpick or stir stick glued to the back of the legs for extra support).
- See the photo of Blue's Clues for what a toilet paper roll craft looks like on it's haunches and the photo of Vulpix for what it looks like on all fours.
- Close the photo windows when done viewing to return to this screen
Templates:
- Close the template window after printing to return to this screen.
- Set page margins to zero if you have trouble fitting the template on one page (FILE, PAGE SETUP or FILE, PRINTER SETUP in most browsers).
Template (color) or (B&W)
Print friendly version of these instructions
Thanks to Shayla for the following great idea!
To make your own hamster wheel you will need:
- a thin piece of paper
- cardboard
- a little clay
- hole puncher
- scissors
- glue,
- tape
- ruler
- really thin stick
- Optional: crayons.
Instructions:
- Make the paper into a circle shape.
- Cut the cardboard into 6 strips as long as the paper circle and an inch wide, make two more one centimeter wide.
- Take the clay and make it into two balls, then punch a hole in the middle of 2 of the cardboard strips.
- Make 2 more of the strips into circles as big as the balls of clay, cut off the excess cardboard.
- Tape the tops of 2 more of the strips together, do the same thing with the last ones, then glue the to cardboard circles to the taped part.
- Tape the strips with holes in them through the sides of the paper circle like a no smoking sign except without the gross cigarette.
- Push the stick through the holes.
- Make sure that a bit of the stick is sticking out, then put the parts that are sticking out through the cardboard
circles and make sure you put the clay on what is left of the stick. - Decorate it!