DLTK's Crafts for Kids
Tyrannosaurus Rex Dinosaur Craft
 If you don't want a huge project,
but still want a dinosaur, you could do this as a paper craft (just glue the pieces
together) or you could just print and color the first template (the head).
If you don't want a huge project,
but still want a dinosaur, you could do this as a paper craft (just glue the pieces
together) or you could just print and color the first template (the head).
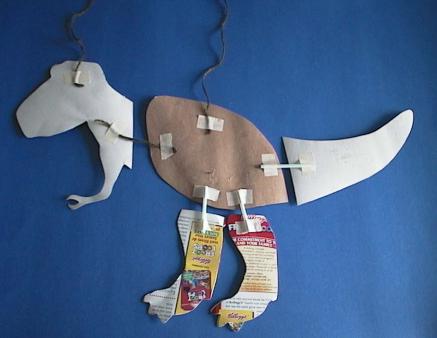
The girls really liked playing with this (though Kaitlyn aged 3 managed to rip off the tail and a leg before she was done... Oh well, they were easily re-attached)
Although younger children (Age 2 thru 5) will
have fun colouring the pieces and playing with the finished puppet, the craft is really
more suited to Age 5+ if you want them to work fairly independently as it's quite a bit
longer of a project and gets a bit fiddly at the end.
Suggestions from viewers. Thanks!
Gayla wrote: "You know how you suggest using the straws on the legs, tail, and one arm? I happened to cut the part of the straw that has the rigid part that bends and I used that to connect the pieces. The result is that you can "bend and shape" the legs, tail and
arm because the rigid part of the straw holds shape."
Nancy wrote:
" You could also print each template twice (four times for the legs) and print the extras in reverse. Then you
could paint them in the same manner as the first set (just remember to keep the pieces in reverse), and glue them to the back of the puppet after the strings or straws
are attached so it will be double sided."
Materials:
- two or three 2 ft pieces of wool or string (the smaller the kids, the shorter you should make it... You can always shorten it later if you need to),
- a few shorter snippets of wool or string
- Optional: straws (Gayla wrote that flex straws are really neat to use.)
- a printer,
- glue,
- scissors,
- something to color or paint with (I like paint for this project as there are a lot of pieces to color and paint goes a bit quicker -- the one in the photo above is brush, finger and rag painted... What a lovely mess we made)
- Optional: a rag
- some poster board or cardboard (empty cereal boxes work great and we recently discovered frozen food dinner boxes also work *grin*)
- and 5 pieces of paper .
Instructions:
- Print out the template (4 templates... Print the leg twice = 5 pages).
- Cut the template pieces out
- doesn't have to be exact at this point, because we'll have to cut the pieces out again.
- This is a good time for younger kids to do the cutting.
- Just tell them to cut about an inch or two
outside the lines.
- Glue the pieces to the cardboard, SEPARATELY (don't try to make it look like a dinosaur yet).
- Color or paint the template pieces as appropriate (you don't really need to wait until the glue dries, but you certainly can!).
- Optional: if you chose to paint, let dry
for about 10 minutes.
- Then take a rag and dab it on the paint.
- It will give a rough texture to the paint (dinosaur skin looking).
- We've done this in our photo.
- You could also try painting light green or brown, letting dry and then taking bubble wrap with darker green paint on it and pressing it on the dinosaur to make a different, sort of circle-ish, texture.
- Once dry, cut out the template pieces (this is where an adult will come in handy... cardboard is a bit tougher to cut through).
- Turn the pieces all face down and assemble them on the table to look like a dinosaur, leaving about an inch between each piece.
- Take snipets of string and glue them to connect the pieces (then tape for added support). (see the picture below)
- Optional: instead of string, use the straws for the legs and tail. This will keep them from spinning in the wind if you don't attach long strings to them.
- Take your 2 or 3 long strings and glue/tape them
to the back of the head, tail and body. If you chose to only use 2 you can either
skip the tail or the head (we skipped the tail)
- You could take 5 strings and attach to the legs too, but it was my experience that this was too hard for the kids to manipulate (they only have 2 hands after all!).
- Now lay it down on the table and stretch the
strings up.
- Measure and trim so the strings are the right height for your child (leaving enough to make loops in the end of the string) and
- so the strings are all the same length with the dinosaur positioned normally.
- Tie loops in the ends of the string to put your hands through.
- Once everything including the string attachments are completely dry, you can make your dinosaur puppet strut its stuff and move its head and tail.
Templates:
- Close template window when done printing to return to this screen.
- Set page margins to zero if you have trouble fitting the template on one page (FILE, PAGE SETUP or FILE, PRINTER SETUP in most browsers).
Head Template (color) or (B&W)
Legs Template (print 2) (color) or (B&W)
Tail Template (color) or (B&W)
Body Template (color) or (B&W)
Print friendly version of these instructions.