
DLTK's Crafts for Kids
Groovy Grandma Apron
with pencil lead stencil templates
The girls had a hoot making this Groovy Grandma apron for grandma Gloria's birthday this year. I think I'll have to iron it before I give it to her -- I'm just looking at the photo as I type up these instructions and realize it's a tad creased. *grin* You can make a gardening or cooking apron (depending on which stencils you use).
As most regular visitors to the site know, I tend not to do crafts that require the purchase of a lot of supplies. The exception to this rule is when the girls are doing crafts as gifts. We still try to keep the supplies to a minimum (for example, in this project we made our own 'pencil lead stencil' templates instead of buying stencils) -- sometimes our grand gift plans don't work out quite as expected so we try to keep things inexpensive (we've had a few projects end up with the trash collectors instead of the intended recipients *laugh*).
We purchased the plain apron ($8 Canadian) and a set of 6 fabric markers ($15 Canadian) at our local craft store. We used the markers (and the pencil lead templates) to make this apron for grandma, shoes for ourselves and a purse for our cousin and they're now safely squirreled away in the craft supply drawer for future projects (they'll likely dry out within 6 months or so whether we use them again or not). Other projects I'm pondering using them for in the next little bit are a pillow case for Kaitlyn and a friend at a sleepover party and some Christmas napkins for "I'm not sure who yet".
Materials:
- plain white apron.
- fabric markers in whatever color you'd like.
- Printer and paper
- Pencil (just the ordinary kind)
Instructions:
- Before you get started -- fabric markers stay on fabric... so wear old clothes and don't do this in the middle of the living room carpet *wink*
- Print out the template(s) of choice or design your own. There's a wide variety of flowers, bugs and kitchen stencils to choose from.
- Cut the templates out in large squares and lay them around the apron to plan out your design.
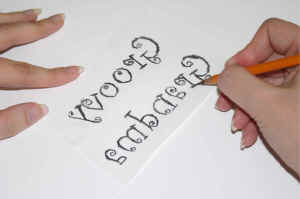 Turn the template OVER. You should be able to faintly see the
black lines through the paper.
Turn the template OVER. You should be able to faintly see the
black lines through the paper.- On a hard surface, color roughly everywhere you can see the template outline through the paper.
- And now you have a "pencil lead template"!
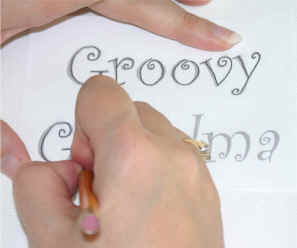 Lay the "pencil lead template" on the apron where you want
the image to show up.
Lay the "pencil lead template" on the apron where you want
the image to show up.- Again, on a hard surface, draw a firm single pencil line over the template. When you lift the paper, the pencil lead you colored on the back will be transferred onto the apron as a light image.
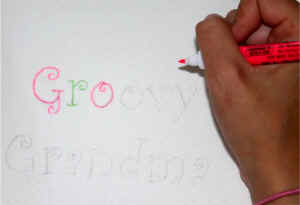 Use your fabric markers to trace over top of the stencil lines.
- Feel free to color in any areas you want after you transfer all of your images to the apron.
- You can add hand-drawn dots, swirls, hearts, flowers, etc to make things fancier as well. (little daisies on the teapot, for example, are quite nice!)
"Groovy Grandma" Templates:


Print friendly version of these instructions