DLTK's Crafts for Kids
Ladybug (Ladybird) Three Dimensional Craft
I always smile happily whenever I receive notes from places other than Canada... It tickles me to read the little differences in terminology. I'm embarrassed to admit that when Marie first wrote to me, I scoured the "birds" section trying to figure out what she meant... she later sent along a picture and it all clicked *grin*.
Marie wrote: You know the ladybird invitation card you have well we made a "shaped" ladybird ie use the basic ladybird stencil and cut in a little at the four corners of the ladybird and staple. So you have a raised ladybird instead of a flat one if you know what I mean. It works well for tortoise in brown/green hexagonal shapes. Just stick on four feet and head. It is just one piece of card too. If you can't understand what the idea is I will try to send a picture. Fantastic site, ideas are simple just what we need.
Thanks so much for your contribution, Marie!
Materials:
- black construction paper, poster board or cardstock
- red construction paper, poster board or cardstock
OR - printer,
- paper,
- stapler,
- scissors,
- glue,
- printer and paper
- Optional: either wiggly eyes or white paper
Instructions:
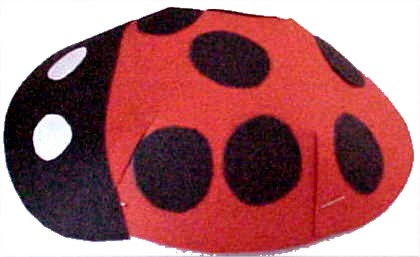
- Trace a lunch size or dinner size plate onto the red paper
- Cut equal sized slits onto 4 equal spots on the circle
- if you think of it as a clock, you want to cut at 12, 3, 6 and 9.
- Make sure each slit only goes about 1/4 of the way across the circle.
- Fold the cuts inward to create a "bowl shape" and tape or staple them
- Trace the same plate onto a piece of black paper.
 Cut the black circle in a
little less than half and then cut a bit of a moon shape along the straight edge.
Cut the black circle in a
little less than half and then cut a bit of a moon shape along the straight edge.- Glue the head onto your 3 dimensional red body
- Glue wiggly eyes or white circle paper eyes onto the head
- Cut 5 or 6 small black circles out of black construction paper and glue these "spots" onto the body
Note: Rather than tracing a plate you can use the printable templates below.
Templates:
- Close the template window after printing to return to this screen.
- Set page margins to zero if you have trouble fitting the template on one page (FILE, PAGE SETUP or FILE, PRINTER SETUP in most browsers).
Template color or B&W
Print friendly version of these instructions