DLTK's Crafts for Kids
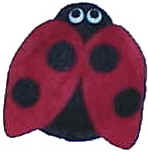
Ladybug Bean Bag
The project requires either sewing or hot glue skills. A child of age 7 or so could do the project with adult supervision. Younger children can help stuff the project and would love to receive it as a gift from an older sibling, parent or grandparent.
You could put in stuffing instead of rice to make this more of a "pillow ladybug" than a beanbag.
There is a choice between a small bean bag (regular sized beanbag) and an extra large beanbag (basically the size of a full sheet of paper).
This is a terrific first sewing project for children. If using it as such, I recommend having the children sew the body pieces together using a running stitch or a blanket stitch and then glue the remaining pieces together. I would fill with pillow stuffing instead of rice ... stuffing won't leak out as easily if the child didn't keep their stitches tight enough.
Susan adds: for the lady bug bean bag craft, I wanted to use it for younger children while still retaining the use of the different texture. I did two versions. For one I used the templates in felt but only one side with the small version and I made it smaller on the photocopier. Then we cut out the pieces in felt and glued them on to popsicle sticks and made finger puppets. For the second version I used foam pieces and we did the same thing and glued them onto popsicle sticks.
Materials:
- two pieces black felt
- one piece red felt
- scrap of white felt or 2 wiggly eyes.
- hot glue OR sewing machine OR needle and thread
- rice OR small beans (or pillow stuffing, cotton balls or toilet paper if you'd prefer a pillow to a bean bag).
- scissors,
- scotch tape
- printer and paper
Instructions:
- Print out the template (see bottom of this page).
- Cut out the template pieces.
- Scotch tape the ladybug body template to one of the pieces of black felt.
- Cut the shape from the felt
- I scotch tape templates onto felt instead of pinning them as I find it easier... It doesn't "buckle" as much. It's very easy to just pull any tape off the felt after cutting
- Make sure you scotch tape liberally!
- Repeat with the second piece of felt.
- Scotch tape the wing to the red felt and cut out. Repeat a second time.
- Scotch tape the circle to the leftover black felt and cut out the circle... You can make 2 to 6 circles, depending on how many spots you want on your ladybug.
- Put the two body pieces together and hot glue them, leaving a space at the top to add rice or stuffing.
- If you're hot gluing, do a 2 to 4 inch section at a time (so the
glue doesn't harden on you).
- The less experienced you are with hot glue, the shorter the section should be.
- I usually have my daughter use a popsicle stick to press pieces together without getting any of the heated glue on her skin... I just use my fingers.
- My 9 year old daughter has been able to use my "low temp
craft glue gun" with supervision for a couple of years.
- Fill with rice or small beans (a funnel or a home made funnel made of
paper will help with the pouring). Sew or glue the hole shut.
- NOTE: I usually put 4 or 5 cotton balls in before I add the rice... This keeps the bean bags from being too heavy.
- Glue the wings to the body.
- Glue the spots to the wings.
- Glue on the white spots or wiggly eyes.
- NOTE: If you are sewing instead of hot gluing, I would recommend sewing the spots onto the wings, then sewing the wings onto one half of the body and lastly sewing the two pieces of the body together. That way you can tie knots and whatnot on the back side of the fabric. If sewing and adding rice, make sure you sew the body with small, tight stitches (sewing machine or blanket stitch) so the rice doesn't leak out.
Templates:
- Close the template window after printing to return to this screen.
- Set page margins to zero if you have trouble fitting the template on one page (FILE, PAGE SETUP or FILE, PRINTER SETUP in most browsers).
- You need to print both templates
Small Beanbag Template
Large Beanbag Template 1 Template 2
Print friendly version of these instructions