DLTK's Crafts for Kids
Watercolour Techniques
contributed by Kaitlyn Guenther
 There are lots of different techniques that can make a water color painting more exciting. These techniques are also really fun! Below are instructions on a few of my favourite techniques.
Salt:
The salt technique is one of my favourites. I use it for paintings if I am trying to make sandy or rocky areas.
 Cover the section of paper with a layer of water color paint.
 Sprinkle a layer of salt all of the paper. I use larger grains of salt instead of table salt because I find that it shows up better.
 Let the paint dry completely and then brush the salt away.
TIP: The salt will affect the paint differently depending on how wet the paint is. The less wet the paper, the smaller the salt dots will be.
Tissue Paper (Option 1):
Using tissue paper is a really fun way to add a little texture to a painting. I mainly use it to make clouds in my water color sky.
 Cover the section of paper with a layer of water color paint.
 Crinkle of a piece of tissue paper so you can see ridges and folds, this is where the texture comes from. Then press down on the section of paint with the tissue paper.
 When you remove the tissue paper and let it dry there should be more texture in the paint.
Tissue Paper (Option 2):
You can use tissue paper in two different ways. I love using this technique for more abstract paintings.
 Leave the section of paper blank. You can also choose to do a light coating of paint and let it dry completely before using this technique.
 Crinkle of a piece of tissue paper so you can see ridges and folds, this is where the texture comes from. Dip the edges of tissue paper into the water color paint or use a brush to cover the ridges of the tissue paper with paint.
  Dap the tissue paper onto the paper to give it a textured effect.
TIP: The texture will come out differently depending on how saturated the paint is; if there is more paint than water, the texture will show up darker.
Layering:
One of the best parts of water color painting is that you can change the transparency of the paint. The more water that you have on your brush or that you mix into the pigment, the more transparent the paint will be. This allows you to layer the paint and I find it is useful for detailed paintings.
 When you start layering, you should start with the lightest and most transparent colors.
 Let the first layer of paint dry completely before starting with the next layer. The next layer shold have less water and more paint.
 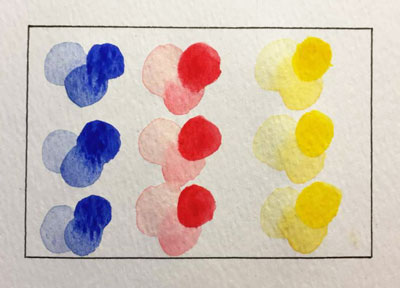 Continue to add layers of different transparency to your painting.
TIP: To practice this technique start with simple shapes like circles and try to use the same color so you get used to how water changes the paint.
TIP: You can layer different colors when you use this technique in a painting, but make sure that you always start with lighter and more transparent colors.
Water Droplets:
Water color painting is great becuase the paint has a mind of its own. This technique is a great example of this. I love to use this technique for abstract painting and backgrounds.
 Cover the section of paper with a layer of water color paint.
 While the paper is still wet, dip a clean brush in water so that it is dripping. Hold the paintbrush over the painted section and let the water drop onto the paint.
TIP: Keep the paper flat on the table while the paint dries. There will be a lot of water for this techique, so the drying process may take longer.
TIP: Try doing several drops in the section of paint and watch as the drops meet each other, it creates a really cool effect.
TIP: Instead of water, use rubbing alcohol becaue it creates a cool effect.
Paint Droplets:
This technique is quite fun because the paint runs in neat patterns. This technique combines the layering technique and the first water droplet technique. I find that it adds lots of excitement to a painting, especially with bright colors!
 Cover the section of paper with a layer of water color paint.
 While the paper is still wet, cover you paintbrush in saturated paint and dip the brush in water, so that it is dripping with paint. Hold the paintbrush over the painted section and let it drop onto the paint.
TIP: This technique works better if the paint droplets are a darker or brighter color than the paint on the paper.
TIP: Keep the paper flat on the table while the paint dries. There will be a lot of water for this techique, so the drying process may take longer.
TIP: Try doing several drops in the section of paint and watch as the drops meet each other; it creates a really cool effect, especially if you use several different paint droplet colors.
Indenting:
This technique is quite fun because the paint runs in neat patterns. This technique combines the layering technique and the first water droplet technique. I find that it adds lots of excitement to a painting, especially with bright colors!
 Cover the section of paper with a layer of water color paint.
 While the paper is still wet, use the end of you paintbrush to press a design into the paper.
 When the paper dries, the design will show up darker than the background.
Dry Base:
This technique is basic but essential. I use this technique to form the base of my painting, expecially if I am doing a more detailed painting.
 Start at the top of the area you want to paint and paint a line of dark paint.
 While the first line of paint is stil wet, get a clean brush wet and pull the paint down to cover the rest of the area.
 Continue to pull the paint down from the original line until the entire area is covered.
TIP: If you continue to add dark paint at the top and only pull down paint part of the way, using water to blend the paint, you can have an ombre effect, where the water slightly grows more transparent.
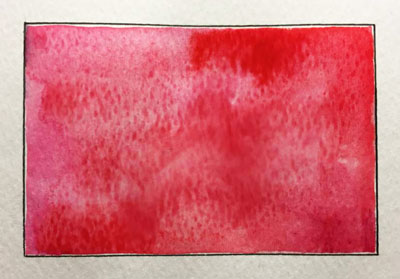
Wet Base:
This technique is also very important. I use this technique to form the base of my painting, expecially if I am doing an abstract painting. This is one of my favourite techniques because I get to use gravity to have fun with the water color paint.
 Cover the area you want to paint in water.
 While the area is still wet, coat your paintbrush in saturated paint and paint a line at the top of the area. Hold the paper up and watch the paint run!
 Move the paper around and add extra paint and water until you are satisfied with effect.
Print friendly version of these instructions