Fan Art
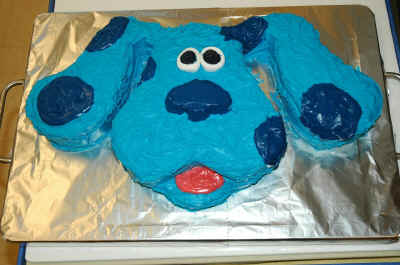
| Heather wrote: I just wanted to add to the long list of delighted parents who used your Blue's Clues cake template with great success! For my daughter's 2nd birthday last year, I made an Elmo cake using a pan from Birthday Express and everyone loved it, but I couldn't find any similar pans for other themes or characters, and I really wanted to make another cake this year with the Blue's Room theme. I found your site when I was looking desperately for a Blue cake pan, and this was even better than buying an expensive mold! I made the cake for my daughter Maggie's 3rd birthday yesterday, and I was so excited about how it came out. I showed it off to everyone I saw, and of course it was a huge hit with the kids. I'm attaching a photo for your collection. Some notes on what I did in case you want to share with others: 1) I used an 11 by 15-inch Teflon pan (technically a roasting pan) that was the perfect size for making the large template. I used two boxes of cake mix, which made the resulting cake the perfect thickness, but be warned that with such a thick cake, the baking time was MUCH longer than for a single box of mix (almost double). It took close to an hour at 325 degrees for me. 2) I strongly recommend greasing the pan with a thick coat of Pam baking spray before spooning in the batter. It contains Pam plus flour, and it works so well that my cake literally slid out of the pan as soon as I turned it over! After cooling for 12 hours, I cut out the shapes and then froze them for an hour, which did indeed make decorating easier, although I still had to battle some crumbs along the sides. 3) When cutting out the template from the paper, I added about a half-inch border around the mouth of your template in order to give Blue a bottom lip - I think she looks friendler this way. When I carved out the indentation for the mouth and lip using this larger size, the resulting leftover piece was the perfect size and shape to use for the nose! I just rounded the corners and added nostrils. 4) For icing, I mixed three 6-oz bags of blue decorator icing plus one 12-oz jar of regular white frosting. The result was the perfect shade of blue, and it was just enough to cover the whole cake. Then I took a fourth bag of blue icing and mixed in many drops of blue food coloring plus a tiny amount of red to make the darker color for the spots and the nose. A tiny dollop of white icing and a couple drops of red were all I needed for the pink tongue. 5) I wanted to make the eyes edible so that no one would accidentally grab them and choke on them, so following others' advice, I froze 2 marshmallows and sliced off just the very end of each (about 1/4 the thickness of the whole marshmallow). Then I added some black to the darker blue icing mix, which made a perfect navy blue for the pupils of the eyes.
|