| [Recipes] [Recipes Alphabetically] [Recipe Categories] [Search Recipes] |
| Print Full Version | Print 3x5 | Print 4x6 |
|
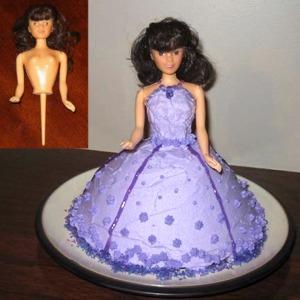
Thanks to Sharla for sharing her cake decorating experience with us! Just want to start off by saying: YOU can do this!! I am not artistic at all and I couldn't believe how great this cake turned out! It helped that I found an easy and hard version of the cake so it was less intimidating for me. The dress cake pan was the part I struggled with the most. I read that a Pampered Chef batter bowl (2qt.) would work to bake the cake in but I didn't have one and couldn't find anyone that could lend me one. I was thinking of using a oven safe glass 8 cup measuring cup but was worried it wouldn't turn out. So, I went to Michael's craft store and found the Wilton Doll cake wonder mold (for $28) and didn't want to spend the $$. I did find a wedding/party store that rented it for $4 and did that. I did purchase some food coloring, sprinkles, a little tube of gel icing and the cake doll from the craft store. I read you can find cake dolls at dollar stores but couldn't find any. Mine was around $5 (pictured above). I used the homemade chocolate cake from this site (I use it all the time) and the icing recipe below which I took from the Wilton Wonder Mold Doll cake instructions: http://www.sugarcraft.com/catalog/pans/2105-565WonderMold.pdf (it was the best!) You can also get some other ideas for the cake there. |
|
|
Princess dress cake Ingredients: Chocolate Cake: • See other recipe Buttercream Icing: • 1/2 cup solid vegetable shortening (lard) • 1/2 cup butter or margarine • 4 cups sifted icing sugar • 2 tablespoons milk • 1 tsp. vanilla • food coloring • gel icing, sprinkles whatever you want to make your cake look pretty • decorating bag and couplers (or tips as I like to call it) Directions: 1. Make the cake as the directions say. Grease pan with solid vegetable shortening and cover with about 2 tbsp. |
|
|
flour so the whole inside of the bowl is covered. 2. Bake on 350 for about an hour or a toothpick comes out dry. 3. Remove cake and cool for 10 min on cooling rack. Gently flip the cooling rack and cake over to release the cake. 4. Cool for 1 hour. 5. For icing: Cream butter and shortening with electric mixer. Add vanilla. Gradually add sugar, one cup at a time, beating well on medium speed. Scrape sides and bottom of bowl often. When all sugar has been mixed in, icing will appear dry. Add milk and beat at medium speed until light and fluffy. 6. Move the cake to a plate you'll serve it on. 7. I used the flatest tip in my small collection of cake decorating supplies for the plastic body of the doll (after I put the doll into the cake). I started at her chest and went down to the cake. After a while the icing stiffens and I flattened it down with my finger so it would look smoother. I used some gel icing for around her neck for the necklace and on the skirt. 8. Then ice the cake with a knife to cover the cake. 9. Then decorate! I used the small flower tip for a lot but you wouldn't have to use any tips at all. Use sprinkles or gel icing to make designs. |
|
| Print Full Version | Print 3x5 | Print 4x6 |