DLTK's Crafts for Kids
Paper Bag Donkey Craft
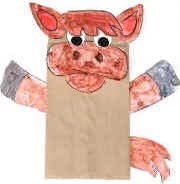
This is a fun and easy cut and paste paper craft that uses a paper bag as a base to make a donkey puppet.
You can either make a grey donkey or a brown donkey.
Materials:
- a paper lunch bag
- for Grey Donkey: grey construction paper or grey poster paint
- a printer,
- some crayons,
- scissors,
- glue,
- paper for the printer
Optional:
- big wiggly eyes
Fun Foam Option:
- brown or grey fun foam -- depending on which color donkey you are making (trace the template pieces onto fun foam and then follow directions as normal)
Print the Template:
- You can either print just template one or both templates.
- The more children you have per adult and the younger the children are, the simpler (less templates) you want the craft to be.
- If you aren't sure how many templates you should use, print both, but hide #2. If the kids make it through #1 and are eager for more, bring out the other. If they are tired of crafting, save them for another day.
- Color (as required) and cut out the template pieces.
Get Familiar with Your Paper Bag:
- I'm going to walk through this slowly. Look at your paper bag.
- It should be closed and flat like a piece of paper. Just like when they are brand new.
- On one side, it's all smooth. This will
be the
BACK
of your puppet
- It's important that all the kids get the back and front straight at the beginning!
- On the other side there's a flippy tab (which
is typically the bottom of the bag when you're carrying your lunch around...)
- This flippy tab will be the HEAD
- Lift the flippy tab up a bit. Underneath
of the tab will be the mouth,
- When the child puts her hand in the bag, she'll be able to make the donkey talk.
- Look at the rest of the front of the bag. (The 3/4 or so of the bag below the part with the flippy tab) This will be the BODY.
- Look at the sides of the bag. There
should be a
FLAP
of paper.
- We'll be slipping the arms (template 2) into this flap.
- If the kids goof and glue the arms onto the front or back of the bag, it isn't a big deal.
- OK, now that we're comfy with our bags, let's craft!
Template #1
- Grey Donkey: Cover the paper bag with grey construction paper (just glue it on and trim) or paint the paper bag grey and let dry.
- Brown Donkey: just use the brown paper bag.
- Glue the small circle with the tongue underneath the flippy tab so you can see part of the circle sticking out from under the nose.
- Glue the nose onto the HEAD. It should overlap the body a bit.
- Glue the eyes onto the HEAD above the nose. If you like, you can use wiggly eyes instead of the paper template pieces.
- Glue the ears onto the HEAD.
- Glue the hair tuft onto the HEAD.
Template #2
- Glue the arms into the FLAP.
- Glue the tail onto the BACK (or you could use wool instead of the template piece)
Templates:
- Close the template window after printing to return to this screen.
- Set page margins to zero if you have trouble fitting the template on one page (FILE, PAGE SETUP or FILE, PRINTER SETUP in most browsers).
Template 1: (brown) or (grey) or (B&W)
Template 2: (brown) or (grey) or (B&W)
Print friendly version of these instructions