DLTK's Crafts for Kids
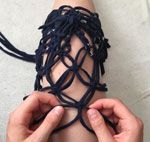
Macrame Produce Bag

Do you have an old t-shirt with a hole in the sleeve, a stain on the front, or you just never wear anymore? This is a perfect project for repurposing an old t-shirt into an adorably fringed, macrame bag. These bags are like the classic produce bag and are great for carrying around fruits and veg, but you can get creative and carry around some other items like books or sports equipment.
This craft is suitable for older children and adults. It does not require many materials and can take anywhere from 1 to 4 hours depending on how comfortable you are tying knots. This is my favourite t-shirt produce bag because it doesn't require any sewing, which I am really bad at... *sigh* I love preparing a few of these bags (getting them ready to knot) and keeping them beside the couch to macrame while I watch a show or film!
Materials:
- old t-shirt (it is best to use a classic cotton t-shirt without any logos),
- scissors,
- safety pin,
Instructions:
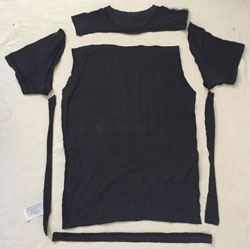 Lay your old t-shirt flat and use a pair of scissors to carefully cut off the sleeves, top, bottom, and sides (in that order).
- TIP: Cut off as little as possible while still removing all of the hems and seams.
- You should be left with two rectangular sections of t-shirt fabric. (Don't worry if there is a little bit of curve to the rectangle where the sleeves used to be).
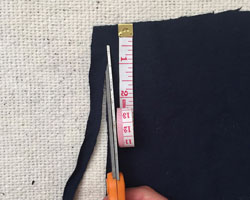 Now you are going to cut the strips.
- Start by cutting a finger-width in a straight line up the length of the t-shirt, stopping just short of the top (about 1/2").
- Then cut again in a straight line a finger-width along the length all the way to the top.
- Now you should have two strips that are just attached at the very top.
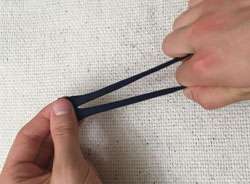 Tug at the strips with your fingers to make them more string-like.
- TIP: Some t-shirts have logos that are ironed on. Avoid using these t-shirts because the strips of fabric will remain rigid around the logos and be harder to macrame.
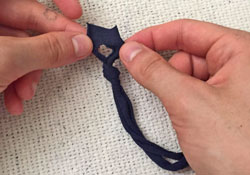 Tie a loop knot at the top of each pair of strips. This should create a small hole.
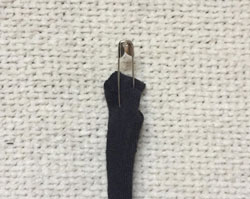 Make a strip of the t-shirt from a spare piece (it doesn't have to be very long). On one end of this strip of fabric attach a safety pin.
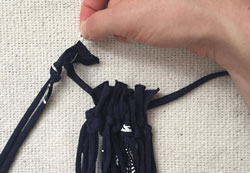 Feed the strip of fabric through the little holes you made in each pair of strips. The safety pin should make this easier.
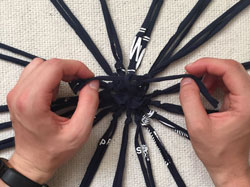 Tighten the strip and tie it in a couple of normal knots. This will be the bottom of the bag.
- Lay the pairs of string in a circle shape.
- You will be using a square knot to macrame.
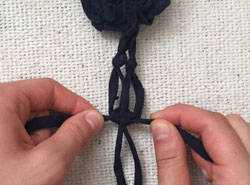
 Take four strings.
 Fold the left string over the middle two strings, creating a 4 shape.
 Take the right string and place it over the tail of the "4" string, underneath the middle two strings, and through the hole of the "4" string.
 To tighten the knot, pull on the ends of the left and right string while holding the middle strings still until the knot is in the right place.
 Now repeat steps 2-4 but in reverse (AKA make the "4" shape using the right string) to secure the square knot.
 Using the square knot above, tie four strips together at a time until all of the strips have been tied.
- TIP: Don't tighten the knot all of the way up. Macrame has little daimond-shaped holes through out, so it is okay for their to be a space between the square knots and the top of the bag.
 When you are ready to move on to the next row, take the two rightmost threads from the left square knot and the two leftmost threads from the right square knot. Now you have the four strips you need to make a new square knot. Continue making square knots in rows around the circle.
 TIP: Lay the bag on your knee to keep it in shape while you make the rows of square knots.
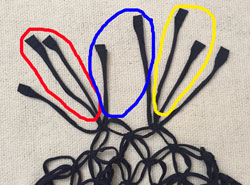 When you are are running out of string and you cannot make anymore rows of square knots, lay out the bag in a circle on a flat surface. This picture shows which strings will be tied together in the next step.
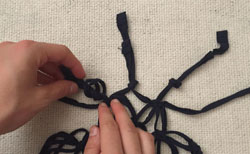 Tie together two strings in a loop knot. Leave a hole underneath the knot so you can thread the handle through later.
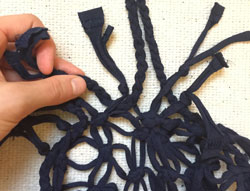 Using three extra strips of fabric you can create a braid for the handle or you can use the loop-hem of the t-shirt (that we cut off at the beginning) and cut it into one long string.
- Thread the braid or long string through each of the holes you just made in order to make the handle for your bag.
 You can also experiment by making this bag out of an old pillowcase. The pillowcase bag looks a little bit different because the strips don't make a string-like shape like the t-shirts do. It works very much the same but with a few differences.
- TIP: Leave the folded part of the pillowcase (right at the bottom) intact. This way you can just cut long strips and fold them in half to create your pairs.
- TIP: When tying your knots using pillow case fabric, be careful pulling the fabric tight because it may rip a bit easier depending on the fabric.
Print friendly version of these instructions