DLTK's Crafts for Kids

 Perler Bead Keychains
Materials:
- Perler Beads with CIRCLE base:
- inexpensive, really neat beads you can pick up a lot of places (we got ours at Wallmart).
- If you already have the square base and don't want to buy another, you can create different characters than we did
- Iron (may require adult assistance).
- String, elastic or wool
- a sharp pencil, a safety pin or a drill with a tiny bit (it gives daddy something to do *wink*).
- keyring circles
Instructions:
- Have the children carefully arrange the perler beads in their preferred shape -- we made all sorts of shapes.
- Follow the directions on the perler beads (basically, you arrange the beads on the form, cover with a waxy paper that comes with the beads and iron for a couple of seconds.).
- Remove the beads from the form and while still warm, poke through the top hole with a sharp pencil or safety pin (or let it cool and daddy can drill it with a small bit... Because of course daddy likes to play too sometimes).
- Thread the string through and tie in a loop onto the keyring.
- Hang from your backpack -- and you're ready for back to school!
Perler Bead Ideas for a Circle Base:
Flower (Large)
|
 |
|
Flower (Small) |
 |
|
Pokeball: |
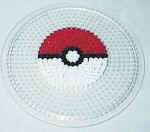 |
center "small flower" of white
surround with one row of black split whole thing with black fill one half with red and the other with white |
Pot of Gold:Make a circle with black beads (ours was the center with three more layers). Take a few of the beads off the top of the circle and replace them with yellow ("gold") Add a black bead on each side of the gold to make the edges of the pot. Add five rows of rainbow colors to the top to complete. |
 |
|
Rainbow: |
 |
leave center "small flower" + one more round blank
one row each of |
Smiley Face |
 |
center "small flower" of yellow put black eyes and smile under and over center fill in with yellow |
WWatermelon Piece |
 |
two rows green, black scattered around, fill in with red |
Watermelon Slice: |
 |
|
Print friendly version of these instructions